

How To Clean Printhead Hp Photosmart Premium
Z7_3054ICK0KGTE30AQO5O3KA30N0
Replacing the Printhead for HP Photosmart Premium All-in-One (C309) and HP Photosmart Premium Fax e-All-in-One (C410) Printer Series
This document is for the HP Photosmart Premium All-in-One (C309) and HP Photosmart Premium Fax e-All-in-One (C410) Series Printers.
A printhead assembly consists of cartridges fitted into a printhead. If the printhead assembly sustains damage or is incompatible with the printer, you might need to replace it. Replacement printhead assemblies are only available from HP Support or authorized service providers.
Order the Printhead Assembly
-
If you are in Asia Pacific, the site directs you to a service center in your area.
-
Search for printhead number CN642A.
-
Follow the instructions to order the printhead assembly.
Replace the printhead assembly
Follow these steps to replace the printhead assembly.
note:Wait until a new printhead assembly is available before removing the cartridges. Do not leave the cartridges outside the printer longer than 30 minutes. Leaving the printhead and cartridges outside the printer for long periods can damage the printer and the supplies.
Step one: Remove the old cartridges
-
Press the Power button to turn on the printer, if it is not already on.
-
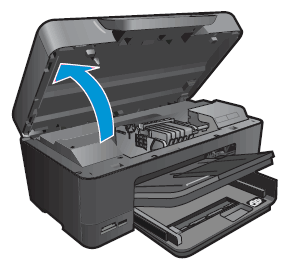
Raise the cartridge access door until it locks into place.
The carriage moves to the center of the printer. Wait until the carriage is idle and silent before continuing.
Figure : Raise the cartridge access door
-
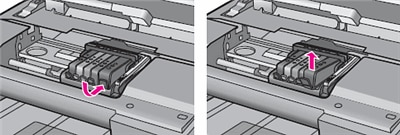
To release an old cartridge, press in the tab on the front of the cartridge, and then pull upwards to remove it from the slot.
Figure : Remove the cartridges
-
Repeat the previous step to remove each cartridge.
Step two: Remove the old printhead
-
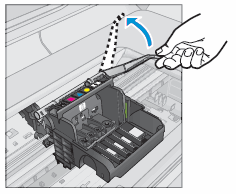
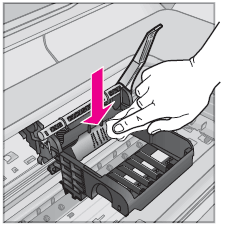
Lift the latch handle on the carriage until it stops.
Figure : Life the latch handle
-
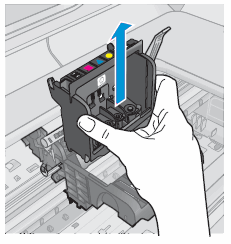
Lift the printhead to remove it from the carriage.
Figure : Remove the old printhead
Step three: Clean the electrical contacts inside the printer
For successful printhead assembly replacement, it is important to get the electrical contacts inside the printer as clean as possible. The replacement printhead assembly comes with pre-moistened wipes.
Figure : Pre-moistened wipes

Use these wipes to clean the electrical contacts inside the printer. Wipe from the top to the bottom of the electrical contacts, in one direction only. As the wipes become dirty, discard the used wipes and open new ones.
caution:Do not wipe up and down or side to side, as doing so can damage the printer.
Figure : Clean the electrical contacts inside the printer
Step four: Install the new printhead
-
Remove the new printhead from the package.
Figure : Remove the new printhead

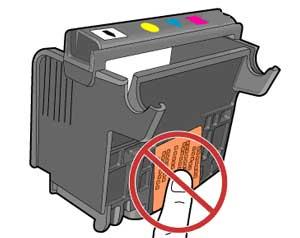
caution:
Do not touch the copper-colored electrical contacts. Do not scratch the electrical contacts on the printer or any other surface.
Figure : Do not touch the electrical contacts
-
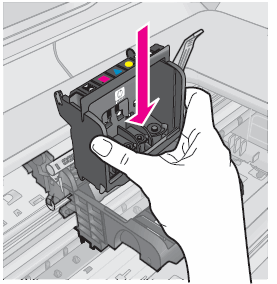
Hold the printhead upright with the colored shape icons on the top.
-
Lower the printhead into the carriage.
Figure : Install the new printhead
-
Carefully lower the latch handle.
Step five: Install the new cartridges
note:Do not reuse the old cartridges. Old cartridges might damage the new printhead.
-
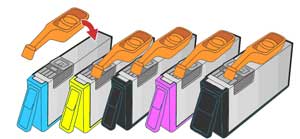
Remove the new cartridge from the package by pulling the orange tab straight back.
Figure : Remove the plastic wrap
-
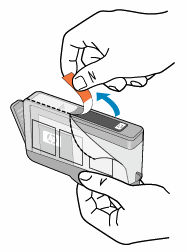
Twist the orange cap counter clockwise to snap it off the cartridge.
Figure : Remove the orange cap

-
With the cartridge contacts facing the printhead, slide each cartridge into its slot as indicated by the colored shape icons on the cartridge and on the printhead.
Figure : Insert the new cartridge

caution:
Do not lift the latch handle on the carriage to install the cartridges. Doing so can result in incorrectly seated cartridges and printing issues. The latch must remain down in order to correctly install the cartridges.
-
Press down on each cartridge until it clicks into place.
-
Repeat this procedure for each cartridge.
-
Close the cartridge access door.
Figure : Close the cartridge access door

Step six: Load paper
When you install new cartridges, the printer prints an alignment page. Follow these steps to load paper into the printer.
-
Lift and hold the output tray in the open position.
-
Slide the paper width guide outwards.
Figure : Adjust the paper width guide

-
Load the paper stack into the input tray with the short edge forward and print side down.
Figure : Insert plain paper

-
Slide paper width guide inward until it rests against the stack of paper.
Figure : Slide paper width guide inward

-
Lower the output tray, and then pull out the tray extender. Flip up the paper catch.
Figure : Close the output tray

Step seven: Return failed parts to HP
If the new printhead assembly came with a post-paid mailing label and instructions to return the failed parts to HP, please do so. HP wants to analyze the parts in order to improve our printers in the future.
If a post-paid return mailing label is not included with the new printhead assembly, you are done, and there is no need to continue troubleshooting.
-
Put the old printhead into the plastic package that the new printhead arrived in.
Figure : Put the old printhead into the package

-
Peel off the lid sticker labeled B and use it to seal the printhead package.
Figure : Peel off the lid sticker

Figure : Seal the package with the lid sticker

-
Use the orange caps from the new cartridges to cap the old cartridges.
Figure : Cap the old cartridges
-
Put the old parts and the form that came with the new parts into the box that the new parts came in. If possible, also include a sample printout that shows the issue with the old printhead.
Figure : Put the old parts, form, and sample printout into the box

-
Close the box, apply the post-paid mailing label, and then put the box in the mail.
Figure : Send the box back to HP

How To Clean Printhead Hp Photosmart Premium
Source: https://support.hp.com/id-en/document/c01794817
Posted by: jamersonstrapead.blogspot.com
0 Response to "How To Clean Printhead Hp Photosmart Premium"
Post a Comment